Usage
To demonstrate the functionalities of Tiler, we follow a typical workflow.
- Get information about a GeoTIFF file
- List available tiles
- Retrieve a tile
The sample.tif located in the data directory of the repository is used for this demonstration.
 Sample orthophoto of Tyrol. Data Source: Land Tirol - data.tirol.gv.at
Prerequisites
By default, the data/ directory is mounted into the application's container. Therefore, to make your GeoTIFF files accessible to the API, you must place them inside this data/ folder. The following examples will work out of the box as the sample.tif file is already included in this directory.
INFO
You can change the configuration of the mounted volume to suit your needs. For more information, refer to the Customization section.
1. Retrieve Info
To get information about a GeoTIFF file, use the /info endpoint. This endpoint provides metadata about the file, such as its dimensions, coordinate reference system, number of bands and other relevant details.
import httpx

base_url = "http://localhost:8001"

response = httpx.get(
    f"{base_url}/info?tif=data/sample.tif",
)
response.json()curl -X 'GET' \
'http://localhost:8001/info?tif=data%2Fsample.tif'
-H 'accept: application/json'Response
{
  "bounds": [
    83750,
    216000,
    85000,
    217000
  ],
  "minzoom": 14,
  "maxzoom": 19,
  "band_count": 3,
  "band_descriptions": [
    "Band 1",
    "Band 2",
    "Band 3"
  ],
  "dtype": "uint8",
  "crs": "EPSG:31254",
  "width": 6250,
  "height": 5000
}
Among the information provided are the minimum and maximum zoom levels, in this case, ranging from 14 to 19, the coordinate reference system (CRS) - EPSG:31254, and the dimensions of the GeoTIFF in pixels (6250 x 5000). The band count indicates that the image has three bands, which are typically used for RGB color representation.
2. List Available Tiles
Especially, the information on zoom levels is useful to determine which tiles are available for the given GeoTIFF. By default, the /list endpoint provides a list of available tiles for the minimum zoom level.
Without Zoom Level
import httpx

base_url = "http://localhost:8001"

response = httpx.get(
    f"{base_url}/list?tif=data/sample.tif",
)
response.json()curl -X 'GET' \
'http://localhost:8001/list?tif=data%2Fsample.tif'
-H 'accept: application/json'Response
[
  {
    "x": 8712,
    "y": 5756,
    "z": 14
  },
  {
    "x": 8713,
    "y": 5756,
    "z": 14
  },
  {
    "x": 8712,
    "y": 5757,
    "z": 14
  },
  {
    "x": 8713,
    "y": 5757,
    "z": 14
  }
]
Resulting in four tiles at the minimum zoom level of 14. The x, y, and z values represent the tile coordinates in the XYZ tiling scheme.
With Zoom Level
Contrary, specify the parameter zoom to list tiles for a specific zoom level. For example, to list tiles for zoom level 18:
import httpx

base_url = "http://localhost:8001"

response = httpx.get(
    f"{base_url}/list?tif=data/sample.tif&zoom=18",
)
response.json()curl -X 'GET' \
'http://localhost:8001/list?tif=data%2Fsample.tif&zoom=18' \
-H 'accept: application/json'Response
This time around, it results in a list of 143 tiles at zoom level 18.
[
  {
    "x": 139399,
    "y": 92110,
    "z": 18
  },
  {
    "x": 139400,
    "y": 92110,
    "z": 18
  },
  ...
]
3. Retrieve a Tile
Lastly, as part of the typical workflow a specific tile is requested. The /tiles endpoint allows you to retrieve a tile image based on the x, y, and z values.
import httpx

base_url = "http://localhost:8001"
response = httpx.get(
    f"{base_url}/tiles/18/139399/92110.png?tif=data/sample.tif",
    headers={"accept": "image/png"},
)
with open("tile.png", "wb") as f:
f.write(response.content)curl -X 'GET' \
'http://localhost:8001/tiles/18/139399/92110.png?tif=data%2Fsample.tif' \
-H 'accept: image/png'Response
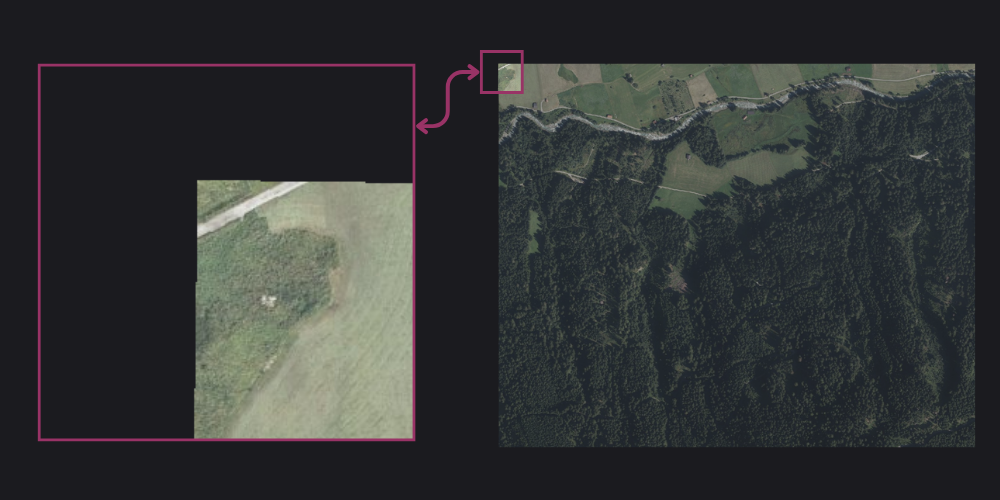
The response is a (256x256) PNG image of the requested tile.
 A tile from the GeoTIFF at zoom level 18.
 INFO
By default, the /tiles endpoint returns a 256x256 pixel PNG image of the requested tile. More parameters will be added in the future to allow for more customization, such as different image formats or sizes.
Putting It All Together
... in Python:
import httpx

base_url = "http://localhost:8001"

# 1️⃣ get info about the GeoTIFF
info_response = httpx.get(
    f"{base_url}/info?tif=data/sample.tif",
)
print(info_response.json())

# 2️⃣ list available tiles at zoom level 18
list_response = httpx.get(
    f"{base_url}/list?tif=data/sample.tif&zoom=18",
)

# 3️⃣ pick a tile from the list
tile = list_response.json()[0]
z, x, y = tile['z'], tile['x'], tile['y']
tile_response = httpx.get(
    f"{base_url}/tiles/{z}/{x}/{y}.png?tif=data/sample.tif",
    headers={"accept": "image/png"},
)

# write the tile image to a file
with open("tile.png", "wb") as f:
    f.write(tile_response.content)